Roofing Problems
When roofing is the focus of your attention, generally it is because something is going wrong, i.e., water is coming into the building. Naturally this only happens in inclement weather, and you may be having other problems such as getting parking lots plowed, the fact that key personnel are not able to make it into work, and the like.The December 2003 column - Gear up for Maintenance - gave suggestions on how to prepare for the worst. Our goal in this column will be to look at some of the most common problems, and how in-house personnel can keep the weather at bay.Roofing Problems-one at a time.
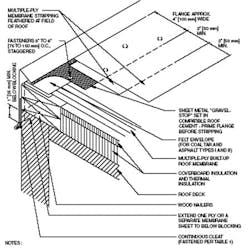
Since bituminous roofs have been around the longest, lets look at their most common problems first and how they can be addressed. Many roofs use a flush metal gravel stop at the roof edge. When correctly installed, the bituminous roofing plies are installed first, right out to the roof edge. There should be a wood nailer, usually a 2x6, which acts as a termination for the roof and is the same thickness as the roof insulation. The metal edging is embedded in roof mastic over the finished roof plies. It is nailed, generally with smooth roofing nails, with spacing 3-6" o.c., but staggered to avoid splitting the nailer. The edging may overlap at the ends, but nails should not go through both sheets of metal, or they will back out as the metal moves back and forth. Over the top of the nailed metal, the roofer installs two plies of roofing felt, both centered over the back edge of the metal edging, but the top one is wider by about 2" so that it is 'feathered' onto the roof membrane. In other words, the metal is now sandwiched between the roofing plies and the stripping plies.No matter how many nails we have used, the metal will still expand and contract with temperature change. After just a few years, these stripping plies will develop small cracks, right over the joints in the metal. At this stage, they are not much to look at, and don't let a lot of water in. With continued inattention, more cracks will appear along the back edge of the metal.Don't count on the roof warranty to fix these. Most warranties exclude embedded sheet metal, and even when there is a 'flashing endorsement', metal gravel stops are not considered flashing!Now comes the easy part. We can patch these hair-line cracks with fairly simple materials and techniques.Take a flat-bladed knife, chisel or spud bar, and scrap back any aggregate surfacing and flood coat, as well as any loose stripping ply felt. Once a sound surface is reached, we need two repair materials, generally available at local hardware stores. Woven glass mesh, 4-8" wide, and asphalt mastic. Mastic is trowelled over the stressed area, and glass mesh is embedded in the mastic. More mastic covers the mesh. Generally a couple of alternating layers of mesh and astic are used.Put the aggregate back? You could, but leaving it off allows us to look at the patches periodically. And besides, they are only going to last a couple of years anyhow, so omission makes it easier to do next time. You can find illustrations and step-by-step instructions for such repairs in the Repair Manual for Low-slope Membrane Roof Systems, a joint publication of the NRCA, SPRI and ARMA.
Since bituminous roofs have been around the longest, lets look at their most common problems first and how they can be addressed. Many roofs use a flush metal gravel stop at the roof edge. When correctly installed, the bituminous roofing plies are installed first, right out to the roof edge. There should be a wood nailer, usually a 2x6, which acts as a termination for the roof and is the same thickness as the roof insulation. The metal edging is embedded in roof mastic over the finished roof plies. It is nailed, generally with smooth roofing nails, with spacing 3-6" o.c., but staggered to avoid splitting the nailer. The edging may overlap at the ends, but nails should not go through both sheets of metal, or they will back out as the metal moves back and forth. Over the top of the nailed metal, the roofer installs two plies of roofing felt, both centered over the back edge of the metal edging, but the top one is wider by about 2" so that it is 'feathered' onto the roof membrane. In other words, the metal is now sandwiched between the roofing plies and the stripping plies.No matter how many nails we have used, the metal will still expand and contract with temperature change. After just a few years, these stripping plies will develop small cracks, right over the joints in the metal. At this stage, they are not much to look at, and don't let a lot of water in. With continued inattention, more cracks will appear along the back edge of the metal.Don't count on the roof warranty to fix these. Most warranties exclude embedded sheet metal, and even when there is a 'flashing endorsement', metal gravel stops are not considered flashing!Now comes the easy part. We can patch these hair-line cracks with fairly simple materials and techniques.Take a flat-bladed knife, chisel or spud bar, and scrap back any aggregate surfacing and flood coat, as well as any loose stripping ply felt. Once a sound surface is reached, we need two repair materials, generally available at local hardware stores. Woven glass mesh, 4-8" wide, and asphalt mastic. Mastic is trowelled over the stressed area, and glass mesh is embedded in the mastic. More mastic covers the mesh. Generally a couple of alternating layers of mesh and astic are used.Put the aggregate back? You could, but leaving it off allows us to look at the patches periodically. And besides, they are only going to last a couple of years anyhow, so omission makes it easier to do next time. You can find illustrations and step-by-step instructions for such repairs in the Repair Manual for Low-slope Membrane Roof Systems, a joint publication of the NRCA, SPRI and ARMA.
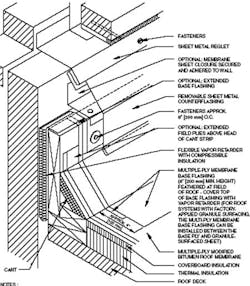
Illustration of Embedded Metal Gravel Stop (Courtesy NRCA)Separate JPG supplied by R. L. FricklasHow about roof blisters?Membrane blisters come in all sizes and shapes. The key point is that if they are holding air under pressure, they are not (at this time) leaking water. We have several options: do nothing, other than keep foot traffic from breaking them; Repair only those that are likely to become a problem from impact damage or those that do get broken; or plan to remove the roof when funds are available. Doing nothing is cost effective, especially if there are just some isolated low blisters. If the aggregate is sloughing off the high spots, apply mastic and sprinkle some aggregate back on. When blisters must be repaired, surface preparation to tie the patch to the surrounding membrane is the key. This means the perimeter of the blister needs to be scraped back to accept a tie-in. This area should be primed, (See column XXI for recipe). Either cut around the perimeter of the blister and lift it off in its entirety, or make an X-cut in the middle of the blister, and peel back the tabs until sound material is reached. Fill in the void with mastic and fold the tabs back down, cutting out excess materials so it lays flat. If material is cut away, fill in the depression with felt and mastic until the area is level with the surrounding membrane. Either roofing ply felts (glass or organic) or coated sheets can be used to do this. Then shingle new felts, starting on the low slope side, and shingle them up slope so there are at least 2-plies everywhere. If your repair team is familiar with torching modified bitumen, that is another option, but keep that fire extinguisher handy!Flashing Problems Flashings are those components that waterproof the membrane at transitions and terminations. For bituminous and MB roofs, the flashing sheet starts about 4" out on the horizontal surface, on top of the roof membrane. It then turns up the wall/curb, extending 8"-12" above the water plane of the roof-higher in snow country. Since the flashing materials are on a vertical plane, they will try to slump in hot weather. If they have been mopped to the wall, the tops of the flashing were supposed to be nailed with capped nails driven into the wall (masonry joints). If the nails are spaced too far apart, or too close to the top edge of the flashing, the flashing may slump anyway. Repairs would depend how bad things are. If the slumping has pulled the flashing beneath the counterflashing, we will have to bend the counterflashing metal up, cut away the base flashing, and start over. Again, mastic and felt, or torched modified bitumens can be used. But lets make sure we fasten the base flashing properly this time. As with the previous repairs, the tie-in at the base of the flashing and membrane is critical to long-term performance. Turn the counterflashing back down to cover the top of the base flashing when done.Severe Wrinkling of the base flashing is sometimes due to differential movement between roof and wall. While the wrinkles themselves are not yet a leak, when they tear, it will be. The most expensive fix is to completely remove the wall flashing, construct a vertical wood curb 8-10" high, and install new flashing to that. The only connection to the wall is that the metal counterflashing now serves as an umbrella, keeping water out of the wall and flashing.
NRCA Illustration of non-wall supported flashing. See Illustration supplied as JPEG by Dick FricklasComplete sets of roof construction detail plates and copies of the NRCA/SPRI/ARMA Repair Manual can be obtained from the NRCA at www.NRCA.net


